
Installation de HP-UX v11.x
par
popularité : 4%

Installation de HP-UX v11.x
<IMG
height=7 src="/hpux/hp/installation/pixel.gif" width=1>
| Figure 2
Choix du clavier : |
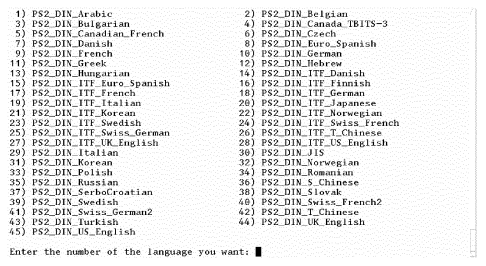 |
- Enter the number of the keyboard language you are using. Then press <FONT face="helvetica, arial" size=2>Enter. This selection determines the key layout of the console keyboard.
Welcome Screen <BR
clear=left>![]()
<BR
clear=left>![]()
| <FONT color=white
size=3>======================================================================== Welcome to Ignite-UX ! Use the <tab> key to navigate between fields, and the arrow keys within fields. Use the <return/enter> key to select an item. Use the <return> or <space-bar> to pop-up a choices list. If the menus are not clear, select the "Help" item for more information. Hardware Summary : System Model : 9000/712/80 +----------------------------------------------------------+ [ Scan Again ] | Disks : 4 ( 5.8GB) | Floppies : 1 | LAN cards : 2 | | CDs : 1 | Tapes : 0 | Memory : 32Mb | | Graphics Ports : 1 | IO Buses : 2 | | [ H/W Details ] +----------------------------------------------------------+ [ Install HP-UX ] [ Run a Recovery Shell ] [ Advanced Options ] [ Reboot ] [ Help ] ========================================================================= |
<BR
clear=left>![]()
This
Terminal User Interface (TUI) screen summarizes the information found by an
initial scan of your target hardware.
- Tab to "H/W Details" and press Enter to get a detailed scan of your hardware. (You can
also do the same thing by pressing D — see the next NOTE).
<IMG height=5 src="/hpux/hp/installation/pixel.gif" width=1>
- Tab to "Install HP-UX" and press Enter to continue with configuring the installation. <BR
clear=left>

- Tab to "Run a Recovery Shell" to manually run HP-UX commands, for example,
in order to recover a system that has crashed. From the interactive shell, the
/sbin/loadfilecommand can be used to load commands that you may need to recover the system. This function is for advanced users only. <BR clear=left> - Tab to "Advanced Options" to get version information and to make changes in process controls.
Tips for using the TUI (character) interface :
|
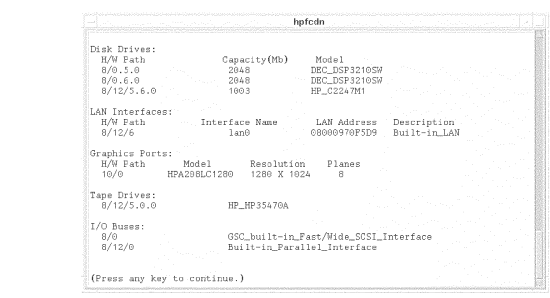
If you selected "H/W Details" in the "Welcome" screen, you will see the following detailed scan of your target hardware :
 |
Select Media
or Network Installation
<IMG height=5
src="/hpux/hp/installation/pixel.gif" width=1>
If you selected "Install HP-UX" in the "Welcome" screen, you will see the
following :![]() width=1>
width=1>
| <FONT color=white
size=3>=========================================================================== User Interface and Media Options This screen lets you pick from options that will determine if an Ignite-UX server is used, and your user interface preference. Source Location Options : [ * ] Media only installation [ ] Media with Network enabled (allows use of SD depots) [ ] Ignite-UX server based installation User Interface Options : [ * ] Guided Installation (recommended for basic installs) [ ] Advanced Installation (recommended for disk and filesystem management) [ ] Remote graphical interface running on the Ignite-UX server Hint : If you need to make LVM size changes, or want to set the final networking parameters during the install, you will need to use the Advanced mode (or remote graphical interface). [ OK ] [ Cancel ] [ Help ] ================================================================================ |
<BR
clear=left>![]()
- Select the Source-Location of installation, by typing an "*" in the box.
- Select among the User Interface options to designate where you intend to
control the installation from. A Remote graphical interface assumes that you
have an Ignite-UX server configured and available.

If you only wish to access an SD depot over the network, then you should choose Media with Network enabled.... You will then be able to specify the SD depot later during the media install. The third selection requiring a network server be configured and
available.
Select Guided Installation. This has the following characteristics : Instructions for each procedure. "Mainstream" configuration. Default disk layout (e.g., no detailed LVM formatting).
Network Information
![]() width=1>
width=1>
(You will not see this screen if you are doing a media-only installation).
| Figure 4
netmedia |
 |
You can enter networking information on this screen. When you have entered
the needed information, tab to
size=2>OK and press
size=2>Enter.
Guided Installation<A
name=guidedinstallation>
<IMG height=5
src="/hpux/hp/installation/pixel.gif" width=1>
If you selected the Guided
Installation from the User Interface Options menu, you will be using the Task
Wizard illustrated here. The Task Wizard is intended to provide help for a
first-time user of Ignite-UX by providing on-screen explanation and a limited
number of steps to accomplish a basic installation.
Note that the Task Wizard is available only on a client-managed (standalone)
installation, and is presented in character-mode (TUI).
The Task Wizard
Welcome Screen
<IMG height=5
src="/hpux/hp/installation/pixel.gif" width=1>
 |
TUI Navigation and
Shortcuts
<IMG height=5
src="/hpux/hp/installation/pixel.gif" width=1>
<A
name=taskwizard>In TUI mode, you will be able
to use the keyboard to navigate. Press
size=2>Ctrl-K
for detailed keyboard help at any time.
HP-family terminals display function key labels (also called softkey labels)
at the bottom of the window. These labels vary depending on the type of window
being displayed, but the functions of
f1-f4 are consistent :
       Key            Meaning
       f1             Help on Context
       f2             Alt  (a modifier key)
       f3             Select/Unselect
       f4            Menubar on/off
To navigate in a typical TUI screen,
you will be doing the following :
- Highlight the field you want, using Tab, if necessary.
- Press Enter to open a list in a selector field.
- Use the up/down arrow keys to highlight a selection.
- Press Enter again to select the item.
- Tab to the next field.
- You may also have to take some action, such as select <FONT
face="helvetica, arial" size=2>OK or <FONT
face="helvetica, arial" size=2>Modify in order to activate
your selection. You can use the local help for the screen (<FONT
face="helvetica, arial" size=2>
f1or <FONT face="helvetica, arial" size=2>Help) to get specific information.
- As a shortcut to specifying an action, you can type the
underlined letter of an item (such as "C" for
<B>C</B>ancel) to activate the item without highlighting it.
- You may also have to take some action, such as select <FONT
face="helvetica, arial" size=2>OK or <FONT
face="helvetica, arial" size=2>Modify in order to activate
your selection. You can use the local help for the screen (<FONT
face="helvetica, arial" size=2>
<A
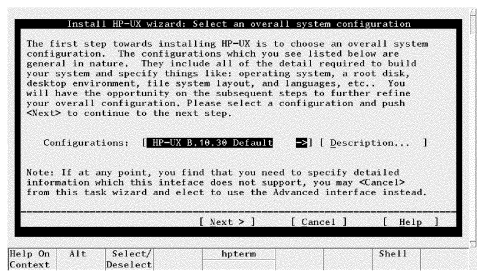
name=thetaskwizardselectingasystemconfiguration>The Task Wizard : Selecting a
System Configuration
<IMG height=5
src="/hpux/hp/installation/pixel.gif" width=1>
 |
Task Wizard Topics
![]() width=1>
width=1>
This screen enables you to select a system environment, such as CDE ("Common
Desktop Environment") to interact with on the target system. Select Next to
continue to a following screen. Select Back to return to a previous screen. On
the last screen, you will select Finish to execute the installation.
If you want to cancel out of the process at any time, select Cancel. You will
see the choices shown above.
The rest of the wizard screens let you do the following tasks :
- Select a root disk.
<IMG height=5 src="/hpux/hp/installation/pixel.gif" width=1>
- Specify the amount of root swap space.
<IMG height=5 src="/hpux/hp/installation/pixel.gif" width=1>
- Select a file system type.
<IMG height=5 src="/hpux/hp/installation/pixel.gif" width=1>
- Specify root volume group disks.
<IMG height=5 src="/hpux/hp/installation/pixel.gif" width=1>
- Select a language(s).
<IMG height=5 src="/hpux/hp/installation/pixel.gif" width=1> - Select a user license.
<IMG height=5 src="/hpux/hp/installation/pixel.gif" width=1>
- Select Additional Software.
<IMG height=5 src="/hpux/hp/installation/pixel.gif" width=1>
- Pre-install disk information. (To allow you to exclude disks from the
install.)
- Pre-install check information. (To allow you to review errors or
warnings.)
- System Summary. (To allow you to see a summary of the install configuration prior to executing it.)
The Task Wizard : Exiting
![]() width=1>
width=1>
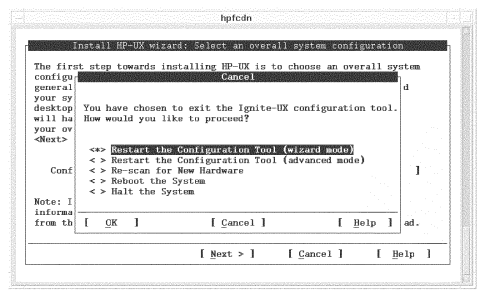 |
If you want to leave the Task Wizard mode at any time, select the <FONT
face="helvetica, arial" size=2>Cancel button, or press <FONT
face="helvetica, arial" size=2>C. You will have the choices
illustrated above.
You may want to leave the Task Wizard in order to do more advanced disk
configuration or to add hardware, for example, in which case you can restart
Ignite-UX in advanced mode in this screen.
Advanced Media Installation (TUI)<A
name=advancedmediainstallationtui>
<IMG
height=5 src="/hpux/hp/installation/pixel.gif" width=1>
If you choose to run an
advanced interface for the media install, you will see the following on the
system you are installing :
 |
Commentaires Forum fermé