Configuration avancée
par
popularité : 5%

Configuring the Installation<A
name=configuringtheinstallation>
Les images qui vont
suivre sont en GUI mais lors de l’installation classique cela sera en TUI.
![]() |
![]() |
If you see the following message :Settings from a previous installation session were found at startup. Do you wish to retain these settings for the current session ? Respond Respond |
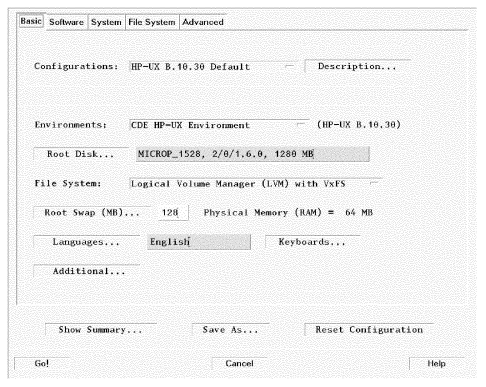
This screen shows all the basic information for setting up the file system and for loading the Operating System (OS) environment. It also allows you to configure languages, locale, and keyboard requirements. A Save As... button also appears, for saving configurations for later use.
Configurations <BR
clear=left>
Click on
this selector to display a list of available OS configurations. Then select the
one you want to use for this installation. The Description... button will
display more information about each configuration.
OS Environment <A
name=os>
<IMG height=5
src="/hpux/hp/installation/pixel.gif" width=1>
Select the operating system
environment from the choices available in the list. For HP-UX 11.0, this may
include 64-bit or 32-bit byte format. The choices and defaults depend on the
releases available on the server, and may include, for example, Common Desktop
Environment (CDE) as the default.
File System <A
name=filesys>
<IMG height=5
src="/hpux/hp/installation/pixel.gif" width=1>
Select one of the following :
- "Whole Disk (not LVM)" This may be the appropriate choice for
single-disk systems.
<IMG height=5 src="/hpux/hp/installation/pixel.gif" width=1> - "Logical Volume Manager (LVM) with HFS (High-Performance File
System)" This selection will format multi-disk systems to combine the disk
space into a single, large disk pool, and then allocate volumes as needed. The
root volume in this case and the swap must be on the same physical volume, and
will be so configured by Ignite-UX. "HFS" is the standard file system format.
The File System tab will give you additional opportunities to configure the
LVM volumes. In the File System tab, you can edit the sizes of LVM partitions,
or use the values that Ignite-UX computes for you.
<IMG height=5 src="/hpux/hp/installation/pixel.gif" width=1>
- "Logical Volume Manager (LVM) with VxFS" (Journaled File System) This will format multi-disk systems to combine the disk space into a single, large disk pool, and then allocate volumes as needed. "VxFS" is the same as the Journaled File System (JFS), and allows file system size to be changed after installation. With the optional HP OnlineJFS you can resize, defragment, or make a "snapshot" of a mounted file system.
Root Disk <BR
clear=left>
To change root disks, select this button, select another disk from the list
of available disks, and select OK in that screen.
For example, a root disk is usually located at SCSI bus location
6
.
Root Swap <BR
clear=left>
The amount of root swap space depends on the applications being loaded. You
can choose to use the default which Ignite-UX computes, based on available
memory on the target system. Or you can select "Root Swap" and select from the
choices that appear in the list. You can also edit the field directly and type
in the amount of swap space you wish. The swap will be rounded to a multiple of
4 MB.
See the manual System Administrator Tasks for how to compute swap
space.
Languages <A
name=languages>
<IMG height=5
src="/hpux/hp/installation/pixel.gif" width=1>
The languages available in your
HP-UX system will be shown when you select this field. Select the item(s) you
want, if it is other than the default. The dialogue screen allows you to select
more than one language. Highlight the additional items by double-clicking on
each. You can also drag the pointer down the screen to highlight a range of
items ; then press the mark/unmark button.
You can make any of the selections the system default language. This will
become the system default language after it is installed.
Locale <BR
clear=left>
Each language will have a corresponding locale (language variant).
A locale describes the system management of a language for doing the
following :
- Messaging
- Representing numbers
<IMG height=5 src="/hpux/hp/installation/pixel.gif" width=1>
- Displaying monetary values
<IMG height=5 src="/hpux/hp/installation/pixel.gif" width=1>
- Telling time
- Generating characters
<IMG height=5 src="/hpux/hp/installation/pixel.gif" width=1>
- Sorting text
HP-UX can have more than one installed language. The "default language" is
the language environment represented on the target system at boot, unless you
select another installed language using the HP-VUE or CDE login screen, reset
the LANG
environment variable, or use geocustoms
(HP-UX 10.30 and after) to change it.
Default Language
Choices
<IMG height=5
src="/hpux/hp/installation/pixel.gif" width=1>
By clicking on Default Language... you have displayed the Default
Language Choices. They are listed in two columns : Language and Locale. Each
language may have more than one way of representing itself on the system. If
this is the case, there will be multiple locale entries for the same language.
Languages may be activated is several ways :
ASK_AT_FIRST_BOOT
allows you to leave the language setting open (unset) until the client system is first booted. At that time, the language setting will be performed as part of the initial system configuration. (This applies only to HP-UX 10.30 and later). <BR clear=left>SET_NULL_LOCALE
creates aNULL
language environment, with the locale variables set toNULL
by default. A null locale allows programs to execute without using localized message catalogs. This can increase system performance. All HP-UX messages appear in English if the locale is set toNULL
.
Keyboards... <BR
clear=left>
Select the type of keyboard to be used, from the adjacent field. Otherwise,
you can use the default selection.
Additional... <BR
clear=left>
This button brings up a screen allowing you to select among certain
pre-configured use-models and variables from your current configuration files.
The buttons which are available will be determined from the variables in your
config file. When using LVM, you will see selections for easily setting up
multiple disks, striping, and file system creation. For details on setting this
up, see the instl_adm (4) man page.
Functions Available on all Tabs<A
name=functionsavailableonalltabs>
<IMG
height=5 src="/hpux/hp/installation/pixel.gif" width=1>
<A
name=saveas>Save As...
<IMG height=5
src="/hpux/hp/installation/pixel.gif" width=1>
In server mode, when you have finished your configuration for all tabs, you
can save the configuration as a specific file. The saved configurations will
then appear under the Configurations menu for use in future installations. This
function is not available if you are running the Ignite-UX interface on the
install client.
Show Summary...
width=1>
Select this button to display the current HP-UX, the basic disk layout,
hardware inventory, and other software that will be installed.
Reset Configuration
width=1>
Select this button to change the configuration settings for the
currently-selected configuration back to the default settings. You can do this
from any tab.
Go !
<IMG
height=5 src="/hpux/hp/installation/pixel.gif" width=1>
<A
name=installusingdefaults>
Clicking on Go ! initiates an installation. Since the Go ! button
is always available, it may be selected from any of the tabs. If you don’t need
to do any customization, select Go ! now to begin the installation.
After clicking on Go !, you will still have the opportunity to cancel
out of the install sequence.
Cancel <BR
clear=left>
Select this button to exit Ignite-UX. You will see a screen which will ask
whether you want to exit the Ignite-UX application.
Help
<IMG
height=5 src="/hpux/hp/installation/pixel.gif" width=1>
Help information is available on all screens, and you can get
context-sensitive help for specific areas by pressing the <FONT
face="helvetica, arial" size=2>f1 function key.
When you have finished with a tab-screen you can go forward or backward by
selecting another tab. Or you can select Go ! to start the installation at any
time.
The Software Tab<A
name=thesoftwaretab>
<IMG height=5
src="/hpux/hp/installation/pixel.gif" width=1>
![]() |
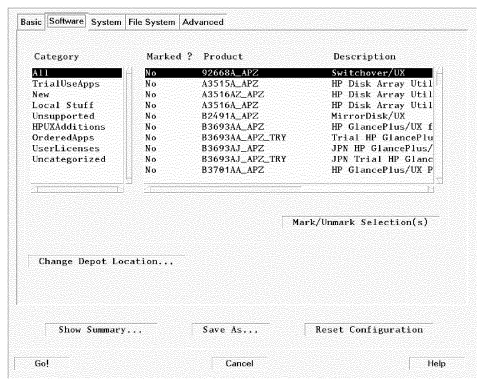
This tab allows you to choose licensing level and additional applications
that you configured when you set up your server. To access a specific depot, you
can also change depot locations.
![]() |
This display does not dynamically update from a
newly-selected depot. When choosing a new depot, it must be identical in
content to the current one. If it is not, you can use the
make_config tool on the server to configure the new
depot. |
- Category : Select on a topical category to display the list of products
available for that category.
<IMG height=5 src="/hpux/hp/installation/pixel.gif" width=1>
- Product List : Double-click on a product in the list to select (highlight) it and to toggle its "marked" status ("Yes" or "No"). You can also use the Mark/Unmark Selection(s) button to toggle the "marked" status for a selected item.
The System Tab <BR
clear=left>
<A
name=tabsystem><A
name=timezonesetting><A
name=daysetting>You can choose not to set any
system parameters for the system during this installation. During the first boot
of the target system, a parameters screen will collect this information.
You will see a choice selection allowing you to set parameters now, or at
first boot of the target system. If you choose to set these parameters now, you
will see the following :
System Parameter Screen
width=1>
![]() |
Hostname <BR
clear=left>
Your system must have a unique system name (a "hostname"), which can be a
simple name (such as cleo
).
A system name must fulfill the following conditions :
- It must contain no more than 8 characters
<IMG height=5 src="/hpux/hp/installation/pixel.gif" width=1>
- It must contain only letters, numbers, underscore (_), or hyphen (-). <BR
clear=left>
- It must start with a letter.
Upper case letters are not recommended. The first component of a host name should contain no more than eight characters, for compatibility with the uname
command.
IP Address <BR
clear=left>
This field will be used to enter the IP address.
IP addresses are of the form nn.n.nn.nnn. For example :
15.1.48.140
You can use the tool nslookup <I>hostname</I>
to determine an existing IP address.
Subnet Mask <BR
clear=left>
This field will be used to set the subnet mask.
The subnet mask will typically be provided by your network administrator, and
is of the form nnn.nnn.nnn.n or a corresponding hex number. For example :
255.255.248.0
<A
name=timeanddateinformation>Time and Date Information <BR
clear=left>
If necessary, type in the information for the Time, Day,
Month, and Year fields :
- Time (Use the 24-hour format :
hh:mm
).
Set Time, Date, Month and Year by entering the information in the fields, as
needed. You can select the correct month by clicking on the button and selecting
from the list, as needed.
Select any of the other fields and type in the correct information, as
needed. Edit by using the
size=2>Backspace and
size=2>Delete-char keys.
Set Time Zone Screen
width=1>
![]() |
Select this button to bring up a display of time zone selections. You will
see two selector lists : the first consists of general locations, and the second
has corresponding time zones.
Select an item and select OK to make a choice.
Set Root Password
Screen
<IMG height=5
src="/hpux/hp/installation/pixel.gif" width=1>
![]() |
The "root" account is used for system administration tasks. To insure the
security of the system, the root account should have a password.
You should observe the following requirements when setting a password :
- The password must be at least six characters long.
<IMG height=5 src="/hpux/hp/installation/pixel.gif" width=1>
- Characters must be from the English alphabet.
<IMG height=5 src="/hpux/hp/installation/pixel.gif" width=1>
- The password should contain at least two uppercase letters, two lowercase letters and at least one numeric or special character.
Network Services<A
name=networkservices>
<IMG height=5
src="/hpux/hp/installation/pixel.gif" width=1>
Select this button to
bring up a set of tabs which will enable you to enter information on the
following :
- Static Routes
<IMG height=5 src="/hpux/hp/installation/pixel.gif" width=1>
- DNS
- NIS
- XNTP
Static Routes Screen
width=1>
![]() |
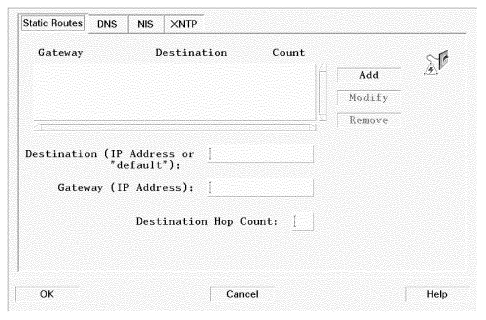
If your network is
divided into subnets, you will probably need to specify a gateway system to
reach other subnets :
- Destination : The field has the word "default" or the IP address of the
destination network.
<IMG height=5 src="/hpux/hp/installation/pixel.gif" width=1>
- Gateway : The IP address of the device connecting your network to the
remote network, or your own IP, if wildcard routing is used.<A
name=hopcountconfiguring>
<IMG height=5 src="/hpux/hp/installation/pixel.gif" width=1>
- Hop Count If your gateway IP is not your system’s own IP, this is usually
set to "
1
". If your gateway IP is the same as your system’s, then the Hop Count is "0
".
For more information, see the routing (7) man page.
DNS Screen <BR
clear=left>
<A
name=dnsconfiguring>
![]() |
On this screen, you can configure the
Domain Name (an extension to the host name, such as fc.hp.com
) and
the IP address of the Domain Name Server. The listing of current Servers is
displayed, if they are predefined in the Ignite-UX server.
The IP address of the Domain Name Server is given in a form such as
15.13.115.168
. Use the command nslookup
on a running
system to find this information.
- Select Add, after you have added a DNS server. Use Modify if you are changing an existing entry.
NIS Screen <BR
clear=left>
<A
name=nisconfiguring>
![]() |
Typically, the (non-server) hosts in a network are NIS clients. Whenever a
process on an NIS client requests configuration information, it calls NIS
instead of looking in its local configuration files. The set of maps shared by
the servers and clients is called the NIS domain.
For more information on NIS, see the domainname (1M) man page, or the
manual Installing and Administering NIS Services .
Wait for NIS Server
on Bootup
<IMG height=5
src="/hpux/hp/installation/pixel.gif" width=1>
Click on yes or no, depending on your configuration for NIS.
XNTP Screen <BR
clear=left>
<A
name=xntpconfiguring>
![]() |
The xntpd
daemon maintains system time, in agreement with
Internet standard time servers. It does all computations in fixed point
arithmetic and clock adjustment code is carried out with high precision.
For more information on xntp
, see the xntpd (1M) man
page.
Additional
(Network) Interfaces
<IMG height=5
src="/hpux/hp/installation/pixel.gif" width=1>
Use this button to bring up the following screen for entering information
identifying additional LAN interface cards in the target system.<A
name=networkinterfacesconfiguring><A
name=additionalnetworkinterfaces>
![]() |
This screen enables you to configure different network interface card(s). You
can enter or change IP and Subnet information, as needed, and designate the
Primary Interface.
![]() |
If the target system has more than one interface, the LAN
card designated as Primary will be the one that is associated with the
host name of the system in /etc/hosts . |
- Select an interface card from the selection list.
- Enter or modify the IP Address, as needed.
- Enter or modify the Subnet Mask, as needed.
- Activate Primary Interface, depending on the status you want for this interface.
- Select Modify when you have finished with changes for each interface.
File System Tab <A
name=filesyst>
<IMG height=5
src="/hpux/hp/installation/pixel.gif" width=1>
<A
name=configurationforinstallfilesystem><A
name=parametersfilesystem><A
name=filesystemparameterssetting>
![]() |
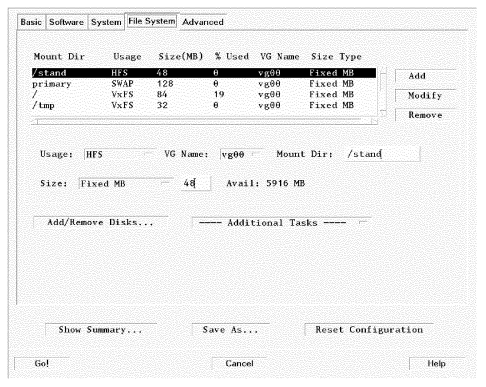
This tab enables you to do a variety of file-system and disk-configuration
tasks and will differ in appearance, depending on whether you previously
selected LVM or whole disk, on the Basic tab. This illustration is what you
would see if you had picked LVM on the Basic tab.
<A
name=addingandchangingfilesystemconfiguration>Adding and Changing File System
Configuration
<IMG height=5
src="/hpux/hp/installation/pixel.gif" width=1>
To add or change any configurations on the display of file systems,
- Enter the information in an appropriate field below the display
- Select one of the buttons to the right
- To see more information on the file system display, use the horizontal scroll bar or resize the screen.
- The "Available" indication shows how much space is unallocated in the volume group of the highlighted volume.
For LVM :
- One of the logical volumes must be root (
/
). <BR clear=left> - A swap volume is required.
<IMG height=5 src="/hpux/hp/installation/pixel.gif" width=1>
- Directory names must have valid HP-UX names (e.g.,
/usr
,/database
, etc.).
The buttons which activate changes are :
- Add
- Modify
- Remove
Generally, changes are not put into effect until you select one of these. If
you make a change and then leave the tab without using one of these buttons,
your changes may not be applied.
Usage <BR
clear=left>
Select this field to display a selection list of file system usage types. If
you want to change file system type or usage for the selected item, select an
item in this list. The usages are as follows :
None
: If you want to protect the data on a disk or file system and "reserve" it from being overwritten during the installation process, select this list, and select "unused" by clicking on this item. Then select the Modify button.
<IMG height=5 src="/hpux/hp/installation/pixel.gif" width=1>
HFS
: Select this item to create a High-Performance File System.SWAP
: Select this item to create swap.
<IMG height=5 src="/hpux/hp/installation/pixel.gif" width=1>
SWAP-Dump
: Select this item to create an area for both swap and system dump.
VxFS
: Select this item to create a Journaled File System. This is an extent-based, journaled file system featuring high-reliability, fast recovery time and on-line administration.
<IMG height=5 src="/hpux/hp/installation/pixel.gif" width=1>
Unused
: This means the logical volume will be created, but not used.
VG Name (Volume Group
Name)
<IMG height=5
src="/hpux/hp/installation/pixel.gif" width=1>
Click on the field to open a selection list. You can choose a volume group
name from the list.
![]() |
Renaming or changing the FS structure of a disk causes the old file system on that disk to be lost (a warning message will remind you of this). |
- If you want to add a new/unused disk and give it a different volume group
name or create a new volume group, select the Add/Remove field and follow the
procedure.
- If you want to reconfigure the volume group in general, including renaming
it, select Additional Tasks
Volume Group Parameters, where you can fill in a custom VG Name, and change other disk parameters.
<IMG height=5 src="/hpux/hp/installation/pixel.gif" width=1>
- Select OK when you are finished with the sub-screens for any of these tasks. You will be returned to the File System tab.
Mount Dir <BR
clear=left>
For the root disk, you should use the standard HP-UX (10.0x) mount
directory designations ("/", "/usr", "/stand", "/var", "/opt"
,
etc.) You can also specify your own mount points such as "/special
"
or "/apps
".
Size
<IMG
height=5 src="/hpux/hp/installation/pixel.gif" width=1>
For setting up each selected file system (as shown in the Mount Dir display),
the following choices are available :
- First select an item in the directory display for the file system you want to change. The current selection will show in the Mount Dir field.
- The sizing method (such as "Fixed Size") currently used for that
particular file system will appear in the Size field. To change the Sizing
Method :
- Make sure the file system you want to change is selected in the directory display list.
- Select the sizing method field to open the list of sizing methods.
- Select one of the items (such as "Size Fixed MB"). It will then remain displayed in that field.
- Select the Modify button to execute the change on the selected file system.
The types of sizing are as follows :
Fixed size : | The selected (highlighted) file system is set to this size. | |
All Remaining : | ||
![]() | The selected file system automatically takes over all remaining file system space on the disk or volume group. | |
Free Size : | Use this selection when you know how much free space you wish the volume to have after the system is installed. The size of the volume will be the specified amount plus the amount the selected software requires. | |
Free Percent : | ||
![]() |
This category is similar to free size, but expressed in percent. It is used if you know how full you wish the volume to be, in percentage of the volume size. If you indicate "20%", then the volume would be 80% full after the installation of the selected software. | |
Size Range : | Select this category in the list to set a maximum size for the file system (the minimum is determined by the software impact on the volume). |
<A
name=addremovedisks>Add/Remove Disks
<IMG height=5
src="/hpux/hp/installation/pixel.gif" width=1>
This opens a display which allows you to do the following :
- Add a new disk and configure its file system type and volume group
designation, if any.
<IMG height=5 src="/hpux/hp/installation/pixel.gif" width=1>
- Remove a disk from current usage on the target system by designating it as
"Unused".
- Determine your current disk usage.
To change a disk usage status :
- Select a disk in the display list.
<IMG height=5 src="/hpux/hp/installation/pixel.gif" width=1>
- Select the "Usage" selection list to set a new usage. If you select
"LVM", a Vol Grp :... button appears.
<IMG height=5 src="/hpux/hp/installation/pixel.gif" width=1>
- Select the "Vol Grp :" button to see the Volume Group Choices or
type in a new volume group name in the entry field.
<IMG height=5 src="/hpux/hp/installation/pixel.gif" width=1> - Select the Modify button, to execute any changes.
Additional Tasks<A
name=additionaltasks>
<IMG height=5
src="/hpux/hp/installation/pixel.gif" width=1>
This button enables you to configure
advanced information in the following categories, as needed : Click on the field
to see the following menu items :
- Disk Parameters.
<IMG height=5 src="/hpux/hp/installation/pixel.gif" width=1>
- File System Parameters.
<IMG height=5 src="/hpux/hp/installation/pixel.gif" width=1>
- Logical Volume Parameters.
<IMG height=5 src="/hpux/hp/installation/pixel.gif" width=1> - Volume Group Parameters.
Clicking on one of these will open a screen which will enable you to change
advanced parameters. The button will retain the label of the area you are
currently working in.
Note : the choices on this screen will differ depending on the file system
choices you made on the Basic tab.
Advanced Disk
Parameters Screen
<IMG height=5
src="/hpux/hp/installation/pixel.gif" width=1>
![]() |
- Highlight a disk in the selection list to select it.
- Configure the Trks/Cyl and Disk RPM by direct editing, as needed.
- Indicate whether Media Init is required, by clicking on the selection box and selecting a choice, as needed.
- Select Modify to configure changes.
- Select OK, to leave Advanced Disk Parameters and return to the File System tab.
Tracks per Cylinder
width=1>
- Select a disk by clicking on its entry in the list displayed. <BR
clear=left>
- Edit the Trks/Cyl field as needed, using the backspace and
left/right arrow keys.
<IMG height=5 src="/hpux/hp/installation/pixel.gif" width=1>
- Select the Modify button, to execute any changes. <BR
clear=left>
- Select OK, to leave this screen and return to the File System tab.
Disk RPM <BR
clear=left>
- Select a disk by clicking on its entry in the list displayed. <BR
clear=left>
- Edit the Disk RPM field as needed, using the backspace and
left/right arrow keys.
<IMG height=5 src="/hpux/hp/installation/pixel.gif" width=1>
- Select the Modify button, to execute any changes. <BR
clear=left>
- Select OK, to leave this screen and return to the File System tab.
Media Init <BR
clear=left>
- Select a disk by clicking on its entry in the list displayed. <BR
clear=left>
- Select the MediaInit button to open the selection list. <BR
clear=left>
- Select "Yes" or "No". If this is set to "Yes", you will also
see the Interleave field.
<IMG height=5 src="/hpux/hp/installation/pixel.gif" width=1>
- Select the Modify button, to execute any changes. <BR
clear=left>
- Select OK, to leave this screen and return to the File System tab.
For more information, refer to the man pages for the following :
- mkfs_vxfs (1M).
<IMG height=5 src="/hpux/hp/installation/pixel.gif" width=1>
- mkfs_hfs (1M).
<IMG height=5 src="/hpux/hp/installation/pixel.gif" width=1>
- mediainit (1).
Intrlv <BR
clear=left>
This field is available if Mediainit is set to "Yes".
The interleave factor, "interleave", refers to the relationship between
sequential logical records and sequential physical records on the disk. It
defines the number of physical records that lie between the beginning points of
two consecutively numbered logical records. The choice of interleave factor can
have a substantial impact on disk performance.
For more information, consult the manual for your disk hardware.
Also see the mediainit (1) man page.
Advanced
File System Parameters Screen
<IMG height=5
src="/hpux/hp/installation/pixel.gif" width=1>
![]() |
These parameters apply only to HFS file systems. You can use the default
values computed by Ignite-UX, or change them, as needed.
When you have finished with this area, select OK to return to the File System
tab.
For More Information
width=1>
To get more details about the following, refer to the mkfs_hfs (1M)
and mkfs (1M) man pages.
- Rotational Delay
- Fragment Size
- Block Size
- Minfree
- Disk Density
- Cylinder/Group
Advanced Logical Volume Layout Screen
![]() |
Use this screen to do detailed configuring of LVM, as needed, in the
following areas :
Cont Alloc
(Continuous Allocation) :
<IMG height=5
src="/hpux/hp/installation/pixel.gif" width=1>
See the manpage lvcreate (1M), for more information.
B-block Relo
(Bad-Block Relocation) :
<IMG height=5
src="/hpux/hp/installation/pixel.gif" width=1>
See the manpage lvcreate (1M), for more information.
Stripes <BR
clear=left>
If two or more disks are in the volume group, then you may enable data
striping over multiple disks for performance purposes.
Stripe Size <BR
clear=left>
Configure this in case you have at least two disks in a volume group and want
to reconfigure the default values computed by Ignite-UX. Ignite-UX uses the file
system block size as the default.
- Type in the stripe size you intend to use.
For more details, see the manpage lvcreate (1M).
LVol Name (Logical
Volume Name) :
<IMG height=5
src="/hpux/hp/installation/pixel.gif" width=1>
- Type in the name you want for the selected volume.
For more details, see the manpage lvcreate (1M).
Logical Volume to
Disk Mapping
<IMG height=5
src="/hpux/hp/installation/pixel.gif" width=1>
This button displays a screen which allows you to restrict the disk drives on
which the volume data will reside. Normally, the data will be allocated over
these disks sequentially.
See the manpage lvextend (1M), for more details.
Advanced
Volume Group Parameters Screen
<IMG height=5
src="/hpux/hp/installation/pixel.gif" width=1>
![]() |
<A
name=volumegroupnamechanging>
Use this screen to do detailed configuring of LVM, as needed, in the
following areas. See the manpage vgcreate (1M), for additional
information.
- Max Phys Exts (Maximum Physical Extents).
<IMG height=5 src="/hpux/hp/installation/pixel.gif" width=1> - Max Phys Vols (Maximum Physical Volumes).
<IMG height=5 src="/hpux/hp/installation/pixel.gif" width=1>
- VG Name (Volume Group Name). This allows for renaming the existing volume
group names.
- Max Log Vols (Maximum Logical Volumes).
<IMG height=5 src="/hpux/hp/installation/pixel.gif" width=1>
- Physical Ext Size (MB) (Physical Extent Size in Megabytes).
Advanced Tab <BR
clear=left>
<A
name=tabadvanced>
![]() |
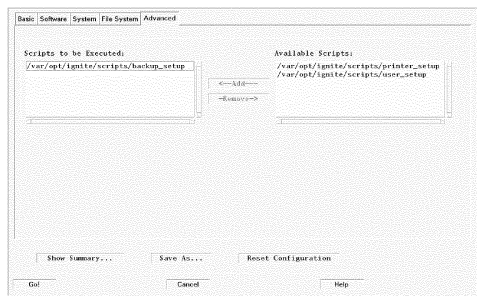
Transfer Lists
width=1>
In this screen you can activate any HP or custom scripts which you might want
to run as part of your installation. Note that the scripts listed are those with
a "scripts" keyword in the INDEX file.
The file /var/opt/ignite/config.local
is a place holder for such
files as you may want to generate for post-install, for example.
For more details, see the instl_adm (4) man page.
Adding a Script
width=1>
To add an item to "Scripts to be Executed" :
- Select the item from "Scripts Available" to select it.
- Select Add to add it to the list "Scripts to be Executed."
Removing a Script
width=1>
To remove an item from "Scripts to be Executed :"
- Select the item in "Scripts to be Executed".
- Select Remove to remove it.
The item will be deactivated, but will continue to be available in the
"Scripts Available" list.